To complete my review of my share of the new summer launches from Barry M I have a post for you on the New Sequin Effects nail paint in the Pink colour!!
This new effect has a rich formula packed densely with sequin specs and is the perfect way to create a dramatic 3D effect on your nails.
Unlike the Confetti effect, these have a colour to them aswell as the sequin pieces. They also don't have as many pieces crammed in as the Confetti sprinkles but because there is a base colour you don't really need there to be.
You can still get away with applying just one coat and still having a good coverage of Sequins. In my photo I used two coats.
They come in 3 colours:
Black - black base colour with Gold sequins in (Sophie will be reviewing this one at a later date)
White - white base with multicolored sequins in (Sophie will be reviewing this one at a later date)
And Pink - pink base with multicolored sequins in
I used my Pink Sequin Effect nail paint over a mint green colour. I wanted to pair it with a shade that was a similar pastel to the pinky base coat but also light enough to not distract from the textured sparkle that the sequin effect gives.
Sequin Nail Effects Nail Paint launched on May 8th so are online and instore already for just £3.99!! What are you waiting for :)
Sophie will be giving her own take on her share of the Barry M launches soon so sit tight and watch this space...x
Pages
Hello and welcome to Cute.A.S.nails!
Here you will see all of our nail art. They are all done by us and are free hand.
We hope you like them and try them all out yourself!
You can also follow us on Twitter and Instagram @cute_AS_nails for daily nail updates!
Alice and Sophie
xoxo
Here you will see all of our nail art. They are all done by us and are free hand.
We hope you like them and try them all out yourself!
You can also follow us on Twitter and Instagram @cute_AS_nails for daily nail updates!
Alice and Sophie
xoxo
Showing posts with label base coat. Show all posts
Wednesday, 29 May 2013
Tuesday, 25 September 2012
Spots&Ditsy.A.S.nails
Good Morning readers!
I'm writing all the way from cold, rainy Cardiff this week! Training for work, very dull...But today's nails are far from that! (also, I didn't know what to name them today).
The base coat is one of my new favourite colours at the moment. It's actually by Next and it's a lovely mushroom/taupe/grey shade. Which I've read is going to be a big colour for Autumn/Winter!
The base coat on the accent ring fingers is a gorgeous pale pink by Barry M. With a cute/messy ditsy, floral print on top (also using Rio pens).
I think the pinks and taupe go surprisingly well together.
Try them :) and have a lovely Tuesday.
I'm writing all the way from cold, rainy Cardiff this week! Training for work, very dull...But today's nails are far from that! (also, I didn't know what to name them today).
The base coat is one of my new favourite colours at the moment. It's actually by Next and it's a lovely mushroom/taupe/grey shade. Which I've read is going to be a big colour for Autumn/Winter!
The base coat on the accent ring fingers is a gorgeous pale pink by Barry M. With a cute/messy ditsy, floral print on top (also using Rio pens).
I think the pinks and taupe go surprisingly well together.
Try them :) and have a lovely Tuesday.
Monday, 25 June 2012
Cherry.A.S.nails
Happy Monday everyone!!
Today we have a mini tutorial for anyone who wants to put the cherry on top of their day and give this fruity design a try!!
I hope you find it helpful!
So this is how it goes:
Firstly apply a base coat of colour. I have chosen Barry M strawberry ice cream. But you could always try white, yellow, blue etc.
Next using a red nail pen (I used Rio) draw your juicy cherries in pairs! Just small round dots. Two next to each other but not touching. Then repeat again and again until you have enough to build a pattern on the nail. I did 4 pairs of cherries on each nail.
Then, for the cherry stalks use a green nail art pen, I again chose Rio. This is basically drawing little X's over the pairs of cherries.
The last step is to add a little dot of white on the cherries to look like a shine. I used Rio white nail pen.
Finally add a clear top coat to complete your gorgeous, shiny, cherry-licious nails!!
I hope you enjoy!!
Today we have a mini tutorial for anyone who wants to put the cherry on top of their day and give this fruity design a try!!
I hope you find it helpful!
So this is how it goes:
Firstly apply a base coat of colour. I have chosen Barry M strawberry ice cream. But you could always try white, yellow, blue etc.
Next using a red nail pen (I used Rio) draw your juicy cherries in pairs! Just small round dots. Two next to each other but not touching. Then repeat again and again until you have enough to build a pattern on the nail. I did 4 pairs of cherries on each nail.
Then, for the cherry stalks use a green nail art pen, I again chose Rio. This is basically drawing little X's over the pairs of cherries.
The last step is to add a little dot of white on the cherries to look like a shine. I used Rio white nail pen.
Finally add a clear top coat to complete your gorgeous, shiny, cherry-licious nails!!
I hope you enjoy!!
Thursday, 21 June 2012
Flamingo.A.S.nails
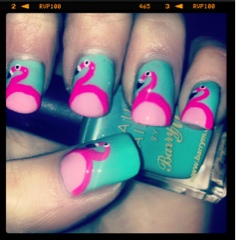
I think the Barry M strawberry ice cream and mint green in my flamingo nails look great together!!
After the base coat of green I did the light pink half moon shapes at the end of each nail next. Then using Kiss nail paint in hot pink I outlined the light pink and did a 'S' shape for the neck and head.
At this point they may not look right but trust me, as soon as you add the beak and goggly eyes, the flamingos take shape!!
These are simple, fun and effective but also a bit different as flamingos aren't the most popular animals you go to see at the zoo!! Even though they do have amazing balance and colour!
Did you know they get their beautiful colour from their diet-mainly algae and prawns..eww!!
Anyway, I'd better flamin-go...and leave you with that fun fact to enjoy these and your day!
After the base coat of green I did the light pink half moon shapes at the end of each nail next. Then using Kiss nail paint in hot pink I outlined the light pink and did a 'S' shape for the neck and head.
At this point they may not look right but trust me, as soon as you add the beak and goggly eyes, the flamingos take shape!!
These are simple, fun and effective but also a bit different as flamingos aren't the most popular animals you go to see at the zoo!! Even though they do have amazing balance and colour!
Did you know they get their beautiful colour from their diet-mainly algae and prawns..eww!!
Anyway, I'd better flamin-go...and leave you with that fun fact to enjoy these and your day!
Monday, 18 June 2012
Chameleon.A.S.nails
So today I've been having a play with Barry Ms NEW Chameleon nail varnish! If you haven't got it or seen it then i suggest you go and buy it NOW!!
Here's how it works -
First you apply a base coat (you should always do this anyway to protect your nails)
Then you apply your chosen Chameleon nail varnish, i chose pink for this one.
You need to wait for your nails to dry before the next stage..
Once you've decided what pattern or design you want in your nails use Barry M Top Coat to create it! Magically the colour changes!
I've then used Barry M Silver Foil Nail Effects to add some more detail!
Now Im off to play with the other colours!!!
Have a colourful day..!
Subscribe to:
Posts (Atom)